
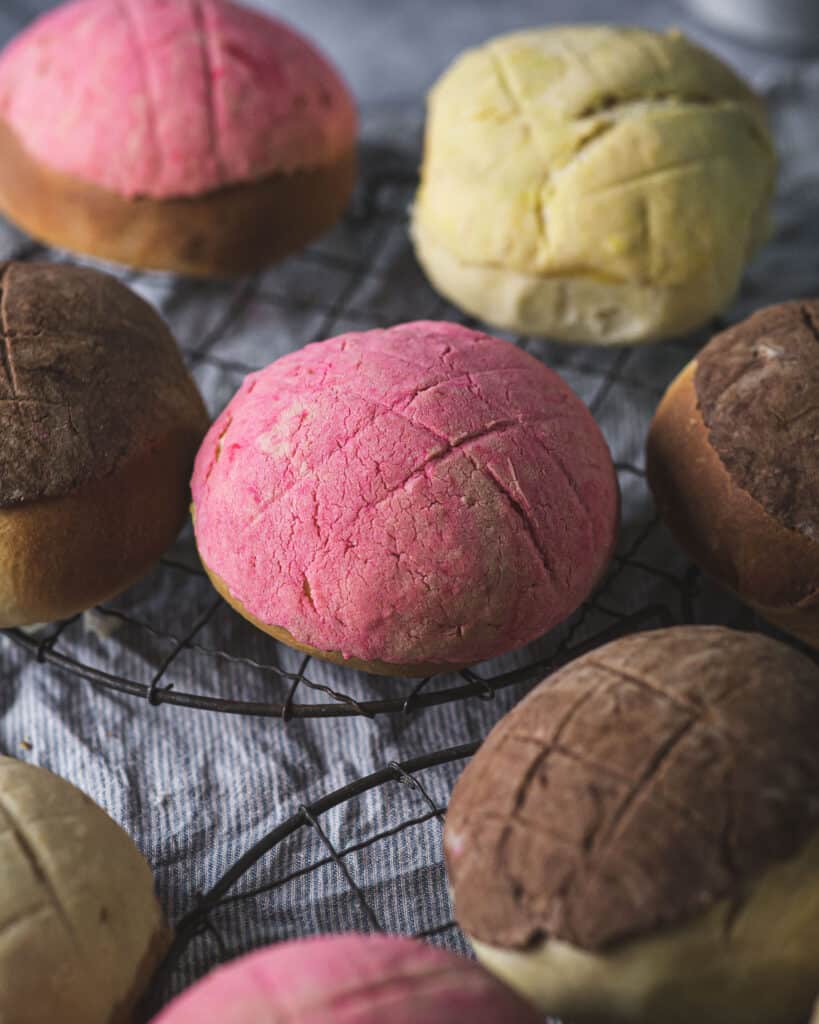
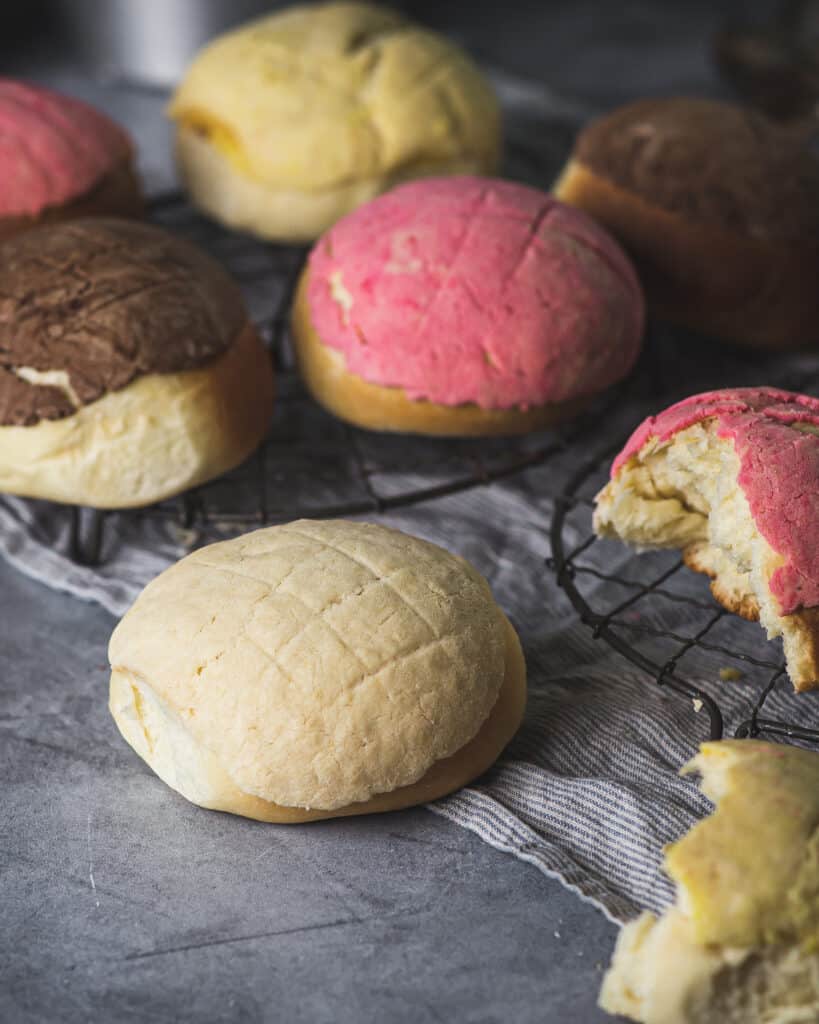
Conchas are Everyone’s Favorite Treat
Some call them conchas, others call them pan de dulce or simply pan dulce, but anyone that grew up near a traditional panaderia cherishes the memories of the happiness a warm concha.
These lightly sweet rolls are popular throughout Mexico, usually purchased in the morning for breakfast, or reserved for a light evening snack with a cup of frothy hot chocolate. Dunking is a must.

The bread base of a concha is the same dough used for Pan de Muertos, Rosca de Reyes, and Pan de Huevo. In fact, all of these breads mentioned are variations of Pan de Huevo. The toppings are simply changed for variety.
Conchas Go Where Cupcakes Fear To Tread
What’s impressive about conchas is that the original baker that developed these classic treats figured out how to make a sweet frosting-like topping that does not melt. The average temperature of my South Texas home on the Mexican border is 88 degrees Fahrenheit.
Every. Day.
That’s no place for a cupcake. The fact that they don’t melt in the car is probably why we like them so much.
Concha Memories
In his older years, my grandfather would send me to pick up his groceries in town, and he always requested conchas, and his favorites were the white ones. “Hey grandad,” I finally told him, “the topping is just colored, and it doesn’t have any flavoring. So why does it matter which ones I bring home?”
“I just like the white ones.” he would reply.
So that’s what I would bring him. Two white conchas in a paper bag, which would have obvious grease spots by the time I got back to the ranch. But their sweet frosting never melted.
Even Stale Conchas Are Delicious
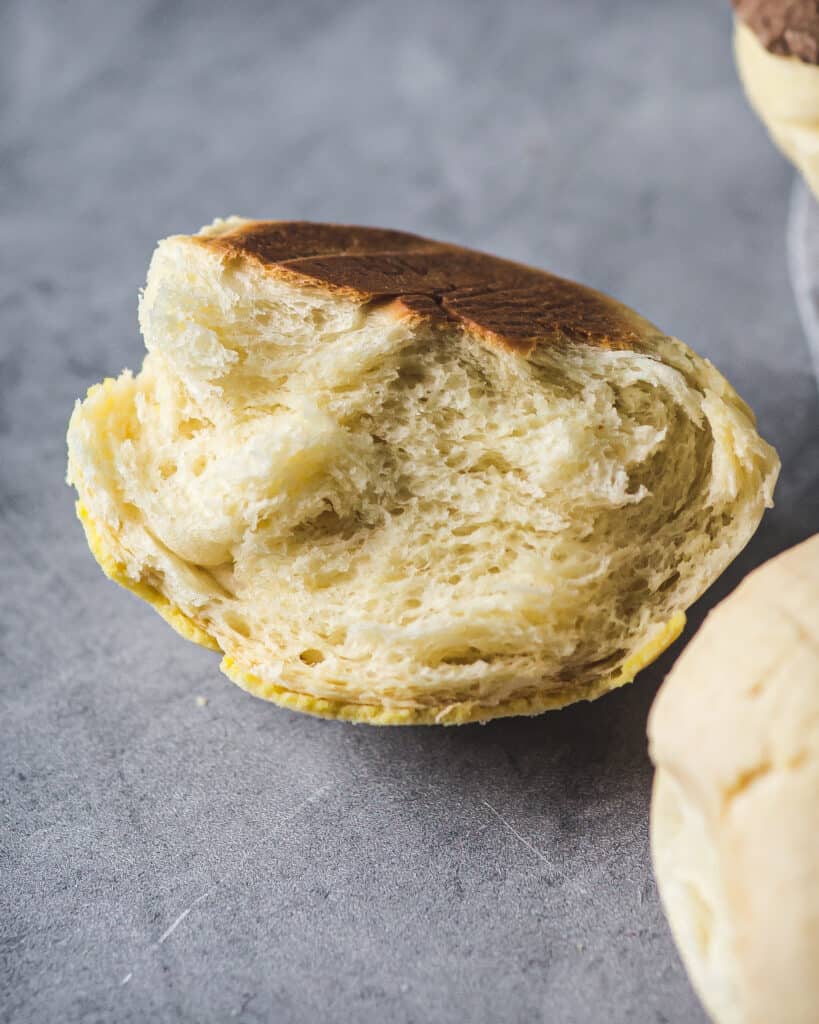
Homemade conchas are extra amazing, but they do go stale pretty quickly, within 12 hours of making them. The remedy is to simply slice the concha and toast it under the broiler (not the toaster, which I learned when hubby tried. The topping caught fire and I lost my trusty appliance.)
And of course, dunking them in your coffee or hot chocolate is always a good call.
Conchas (Traditional Mexican Sweet Bread)
- Prep Time: 2 hours 15 minutes
- Cook Time: 25 minutes
- Total Time: 2 hours 40 minutes
- Yield: 10 Conchas 1x
Ingredients
Bread:
6 – 7 cups bread flour (750–875 gr)
3/4 cup sugar (150gr)
1 tsp. salt (6gr)
3 eggs (room temperature)
3 egg yolks (room temperature)
1/2 cup milk (120ml)
1/2 cup butter (114gr)
2 pkg yeast (16gr)
1 tsp. sugar (4g)
1/2 cup water 100°F-110°F (120ml/38°C-43°C)
Topping:
6 tbsp. vegetable shortening, softened (77gr)
1/2 cup powdered sugar (60gr)
2 egg yolks
3/4 cup flour (94gr)
Coloring options:
1 tablespoon powdered cocoa (4gr)
2–3 drops yellow food coloring
2–3 drops red food coloring
Instructions
Place 5 cups of the flour (625gr) in a large mixing bowl. Stir in the sugar and salt, and set aside.
In a separate bowl, beat together the eggs and egg yolks.
Heat the milk and the butter in a small saucepan over low heat and allow the butter to melt. Remove the saucepan from the heat and allow to cool until the liquid reaches between 100°-110°F (38°-43°C) on a thermometer.
When the milk mixture is ready, prepare the yeast mixture in a separate bowl. Add warm tap water 100°F-110°F (38°C-43°C) to the bowl along with the yeast and stir in 1 tsp. of sugar (4g) Stir once or twice so that the yeast and sugar dissolve. Allow the yeast about 5 minutes to activate and proof.
Once the yeast is activated, slowly add portions of the eggs, the milk mixture, and the yeast mixture to the bowl of combined flour. Stir to incorporate. The dough will be sticky at first. Add more flour, 1 large spoonful at a time, until the dough is too stiff to stir. (NOTE: 10 minutes of kneading time begins when you start to stir the dough together.)
Turn the dough out onto a floured surface and knead with your hands until the dough is smooth and elastic, adding more flour to the surface if the dough becomes sticky. Total kneading time is approximately 10 minutes. Continue to knead until the dough no longer sticks to your hands or to the counter surface. Place the dough in a greased bowl, cover, and allow it to rise in a warm (about 85°F/29°F) draft free environment for 1 hour.
Punch the dough down and allow to rest for 15 minutes. Weigh the dough and divide into 10 equal pieces and form each into a round, domed patty (like a hamburger bun). Place the dough patties on a parchment lined baking sheet. Allow to rise for 1 hour.
While the shaped conchas are rising, prepare the topping. In a small mixing bowl, combine the vegetable shortening, powdered sugar, egg yolks and flour. Press the mixture with the back of a spoon or fork to knead the ingredients together. When the dough is well combined, divide the dough into 4 portions, coloring one portion with the yellow food coloring, another portion with the red food coloring (pink is the desired color) and the remaining portion with the cocoa powder. Leave one portion white. (To divide evenly across 10 conchas, one of the 4 topping portions will have to be smaller for just 2 conchas.)
Heat the oven to 350°F (177°C)
Form the topping dough into equal sized balls. Using a rolling pin or a tortilla press lined with two sheets of plastic, flatten each of the balls into a thin circle that is just smaller than the diameter of the risen bread. Sprinkle extra flour on the rolling surface or in the tortilla press so that the dough does not stick. Place a flattened circle of topping on each of the completely risen breads. Mark each topping using a concha stamp.
Bake the conchas for 25-30 minutes, until they are golden brown around the edges.
Notes
You can substitute all-purpose flour for this recipe, but the conchas will be more dense and less fluffy.
Machine stirring and kneading of this dough takes half the time of hand kneading. Stir the dough together in your mixer with the flat blade attached first, then switch to the kneading hook as the dough becomes more cohesive. From stirring though kneading time will be approximately 5 minutes, but keep an eye on the dough so that it does not over knead.
7 cups of flour for 9 conchas really?
Yep, I checked this. I use this recipe whenever I make conchas, so 6-7 cups for 9 conchas is correct. Let me know if I can answer any other questions!
What can I do if my home is really cold, where should I put the dough to rise? I want to try to make them but it’s freezing where I live and don’t want to waste the ingredient.
so sorry for the delayed response, I just saw this question. I have that issue too in the winter. You can turn your oven onto low for about 10 minutes, and allow it to heat up to about 250 degrees F (use an oven thermometer for best results.) Turn the oven off, and then you have the perfect environment for rising your dough. I have more than one oven, so that works well. If you only have one oven, you could heat a couple of wet towels in your microwave, and then place your bowl of dough on top of those in the microwave. Also, bread can rise in a colder environment, it just takes longer. You could experiment with rising it in the fridge overnight. Simply make the dough, shape it, and put the pan in the fridge. Only one rising, not two, and no punching down. I do that all the time when I am making sweet rolls. I’m too lazy to get up in the morning to make sweet rolls, so I make them the night before, and let them rise in the fridge. Linked below is an example of how I do that. Let me know if I can answer any other questions! Hope this helps!
https://kitchenwrangle.wpengine.com/2018/12/cherry-pecan-cinnamon-rolls-orange-glaze/
Ha! I was always a pink concha girl.;)
I’m making the topping but it’s not forming any suggestions?
What type of yeast?
Hi, I usually buy the packets of yeast in the flour aisle at the super market. Just make sure that it is not Rapid Rise yeast. The packets are the freshest, and will give you the best results.
mg
What do you mean by 2 pkg of yeast because I want to know how many cups is that
Hi, usually i the US yeast is sold in sets of 3 packets, and each packet contain .25 oz or 7 grams. I think in Europe they use cakes of yeast, but here there are small packets so you can buy it fresh every time. I usually buy a jar of yeast, and then measure out .25 oz at a time. I keep the jar in my refrigerator, where it stays fresh. If you buy a jar, there are instructions on the side label that will tell you how to measure the yeast into tablespoons. The convenient thing about the smaller packets is that it is pre-measured. Hope this helps!
You forgot an ingredient, anise in the dough.
Thank you for letting me know!
How much anise
Hi! Here in South Texas, we don’t make conchas with anise, but we do make semitas, rosca de reyes and pan de muerto with anise. I will try to post pan de muerto at Halloween and Rosca de Reyes at Christmas. Stay tuned!
I cannot wait to try the recipe. One question…are thses molletes also the ones that are soft and golden snd which can ve left wothout the sugar paste on too? Toni Dally
Yes, without the sugar topping then it would be pan de huevo, which is the basis for so many Mexican style breads. Enjoy!!
Hello MG! I’m looking to make mini versions of this recipe for a baby shower. My plan is to make 18 or 27 balls instead of 9. For baking purposes, how much time do you think and should I keep temperature the same? Probably won’t find a mini concha stamp, will look, but any other suggestions? Thanks again!
Hi! Your idea sounds darling! I think you should push for the 27 mini-conchas. Using a dull table knif you can make a hashtag # design on the concha, and that will work well. I would leave the temp the same and reduce the time by 30% but check the conchas every 10 minutes so that you don’t have an issue. When you check them, however, do NOT open the oven, as that destabilizes the oven temp. Just look through the window. I would think they would take a minimum of 12-15 minutes. Send pics!
mg
I’m so impatient but put the topping on just after balling out my breads. I guess I will have to let you know how this comes out. I so wanted them to be perfect. ????☹️???? Jennifer
Hi Jennifer, you have to let them rise first because otherwise the topping breaks up too much. The topping will continue to break up when you bake it. But keep trying!
MG
Thank you for this recipe. I made a double batch and they came out great.
I’m so glad! Slowly I will get all the classic recipes on the site! Thanks!
MG
Hello, the anise someone said you left out is it a required ingredient? Because i just cooked these today and i was wondering cause they tasted plain,. Thanks
Hi, in our part of Texas, and where I have visited in Mexico, Conchas never have anise, but semitas do have anise. Sometimes its a regional preference, I think New Mexico uses anise in their bizcochos, but we don’t here in Texas. It must be a regional preference. Let me know if you have had a different experience. Thanks for writing!!
MG
No good. Sadly it was was too dense and raw. It just seemed too elastic so there was no room for the heat to get into the middle of the dough. I did everything the same and it took me a loooong time to make it to just turn out poorly. Maybe I missed something, not sure. Real bummer
Oh no! I am so sorry! I have been using this recipe for years without a hitch. Was it hand kneaded, or by machine? You are right, these are really a chore to make, and it is no fun when they don’t turn out. See if Pati Jinich has a recipe, and try hers out. I have used Patricia Quintana’s recipe too, but it has lots of steps. Let me know if you find another version that is more successful for you so I can see what worked differently. Thank you for trying it though!
MG
Can I flavor these with lemon?
Looks like it will be trial and error to bust out 100 of these, but 2/3 the size, for a wedding reception. *Planning on a Japanese-Mexican menu with sakura and butterfly theme => attempting more of a pastel pink frosting for the conchas
Any ideas how long they should cool before packaging? *Trying to keep them fresh for the dessert table with whatever temp and humidity I’ll be dealing with
Hi there! Yes, flavor with lemon – Suerte restaurant in Austin makes a pistachio concha and a hibiscus concha, filled with flavored custards, ridiculously delicious! Not gonna lie, these conchas go stale quickly, even the grocery store ones. They are more of a bread than a cookie. If you keep them small they might help. I think the custard filling (not traditional at all but totally slurp) helps keep the bread more moist – The other thing would be to serve them with a small cup of hot chocolate for dunking which is TOTALLY traditional and very delish. Best of luck, email me directly if I can be of any help melissa@melissaguerra.com or message me through IG @kitchenwrangler